
There’s something truly magical about a classic crispy tuna melt. It’s not just a sandwich; it’s a symphony of textures and flavors – creamy tuna salad, tangy dill and red onion, and a glorious, golden crust with perfectly melted cheese. This humble dish, when made with a little love at home, transforms into a heartwarming meal that truly nourishes the soul.
I remember cool afternoons, not always in my grandmother’s kitchen for sweets, but sometimes for these savory treasures. The aroma of grilling bread and melty cheese would fill the air, creating instant comfort. Those simple, shared meals taught me the true joy of homemade food, no matter if it was a sweet treat or a savory delight.
This recipe is wonderfully easy, making it a perfect family-friendly meal for any day of the week. Plus, it’s incredibly versatile! My top tip? Don’t be shy with the butter on the bread – that’s the secret to achieving that irresistible golden crispness.
What You Need to Make This Recipe
This comforting tuna melt uses simple, fresh ingredients. Quality canned tuna, creamy mayonnaise, crisp red onion, and fresh dill form the flavorful core. These combine beautifully with Dijon mustard for a lovely tang. I always choose good cheese for the best melt! Full details and measurements are in the recipe card below, ready to guide your culinary adventure.
How to Make tuna melt
Creating this delightful tuna melt is a joy! You’ll start by mixing your flaked tuna with creamy mayonnaise, fresh dill, and red onion to create a vibrant, flavorful salad. Then, generously layer this delicious mixture and your chosen cheese between buttered bread. Finally, grill the sandwiches until each side is beautifully golden and crispy, with the cheese oozing perfectly. Pure comfort awaits!
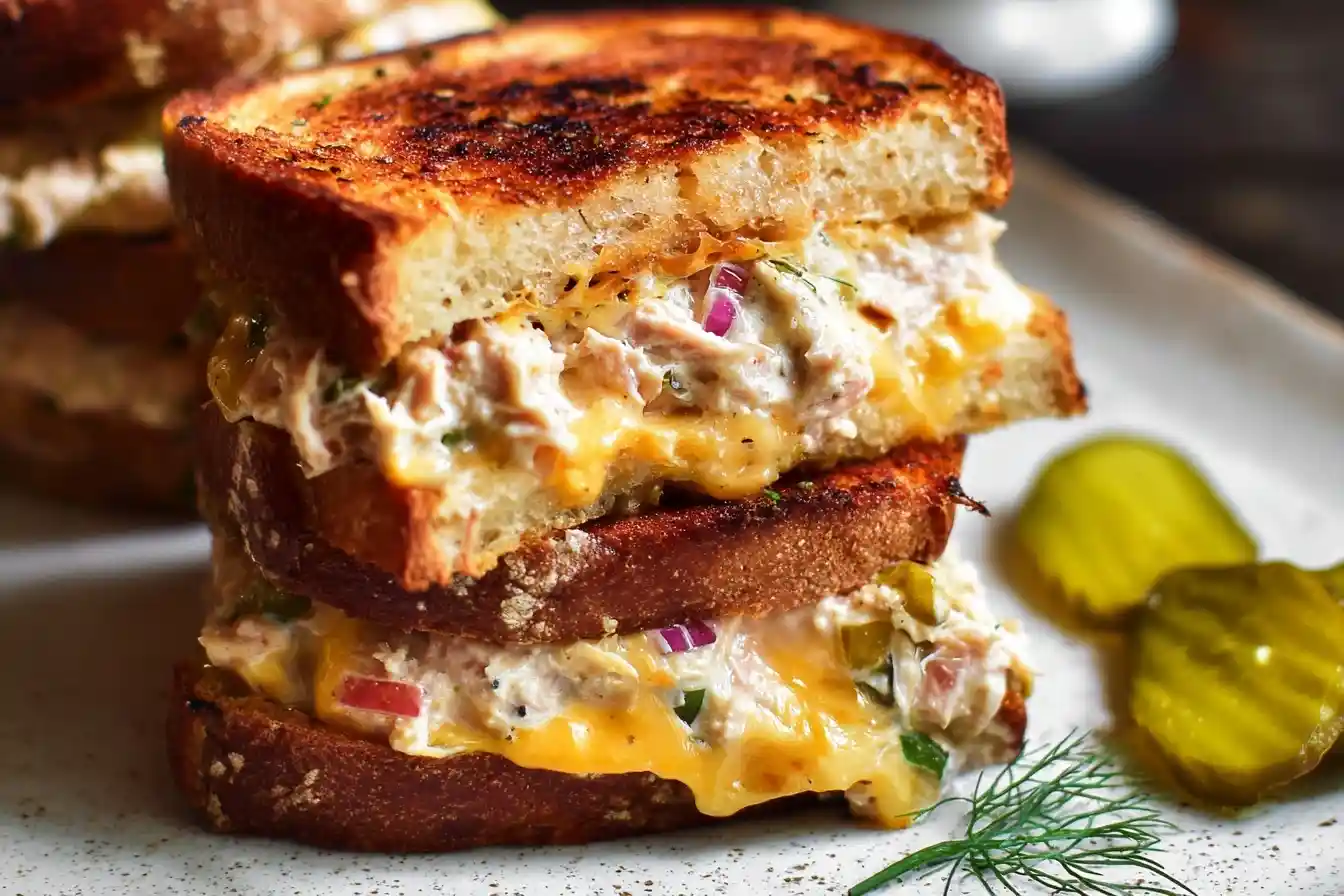
Classic Crispy Tuna Melt with Dill & Red Onion
Ingredients
Equipment
Method
- In a medium mixing bowl, flake the well-drained tuna with a fork. Add the mayonnaise, finely diced celery, minced red onion, Dijon mustard, chopped fresh dill (if using), fresh lemon juice, salt, and black pepper. Mix all ingredients thoroughly until well combined. Taste the tuna salad and adjust seasoning if necessary.
- Heat a large skillet or griddle over medium-low heat. While the skillet is heating, spread softened butter evenly on one side of each of the four slices of bread.
- Place two slices of bread, butter-side down, in the heated skillet. Immediately top each of these bread slices with one slice of cheese. Divide the prepared tuna salad mixture evenly between the two cheesy bread slices. Place another slice of cheese on top of the tuna salad on each sandwich.
- Carefully place the remaining two slices of bread on top of each sandwich, with the buttered side facing upwards. Cook for 3-5 minutes per side, or until the bread is golden brown and crispy, and the cheese is thoroughly melted and gooey. You may need to gently press down on the sandwiches with a spatula to ensure even browning and melting.
- Once grilled to perfection, carefully transfer the tuna melts to a cutting board. Slice them in half diagonally, if desired, and serve immediately with a side of potato chips, a pickle spear, or your favorite soup.
Notes
Pro Tips for Making This tuna melt
Over the years, I’ve learned a few secrets to elevate a tuna melt from good to unforgettable, bringing warmth and nostalgia to every single bite.
For the Perfect Crunch
My top tip: generous butter on the bread’s exterior! A thin, even layer on each slice creates a heavenly golden crust and perfect crispness. Truly transformative for your tuna melt. For more expert tips, see my guide to grilling sandwiches.
Flavorful Filling Secrets
My Secret Trick: I always let my tuna salad sit for 5-10 minutes after mixing, especially when using fresh dill and red onion. This allows the flavors to meld beautifully, ensuring every component shines before grilling. It’s like a little flavor dance before the main event!
Cheese, Glorious Cheese
Choosing the right cheese is crucial for that gooey, melty perfection. My family loves sharp cheddar, but I often recommend a mix with provolone for a lovely stretch. Place cheese on both bread slices before adding the tuna for that perfect, gooey ‘hug’ around the filling!
Low and Slow Wins the Race
When grilling, I always keep the heat on medium-low. This ensures the bread has time to crisp up evenly without burning, and the cheese melts perfectly. Patience is a virtue here, leading to that ideal, ooey-gooey center and golden-brown exterior we all adore.
Fun Variations for tuna melt
Part of the joy of cooking is making a recipe your own, and this tuna melt is wonderfully adaptable! Here are a few ways to add your unique touch, inspired by friends and family.
Spicy Kick
My friend Sarah loves a little heat, so she always asks me to add a pinch of cayenne pepper or a dash of hot sauce to the tuna salad for an extra zing. You could also try a few thinly sliced jalapeños for a fresh, fiery crunch!
Herb Garden Fresh
While dill is classic, don’t hesitate to experiment with other fresh herbs! I’ve found a little fresh parsley or chives can add a lovely subtle difference. My grandmother used to sometimes add a tiny bit of chopped tarragon for an unexpected aromatic twist. Learn more about fresh herbs in savory dishes.
Veggie Boost
For an added nutritional boost and texture, try mixing in finely diced bell peppers, shredded carrots, or even some corn kernels into your tuna salad. A quick and easy way to get extra veggies into a family-favorite meal!
Different Cheeses, Different Dreams
Don’t limit yourself to cheddar! I’ve had delicious tuna melt creations using Swiss, pepper jack for a spicy kick, or even a creamy Havarti. Each cheese brings its own unique character and melt, so have fun experimenting!
What to Serve With tuna melt
A perfect tuna melt is a meal in itself, but a few simple accompaniments can truly complete the experience. These are the pairings that make a cozy lunch or dinner feel extra special.
Classic Comfort Pairings
For me, there’s nothing quite like a warm bowl of tomato soup alongside a crispy tuna melt. The creamy soup and crunchy sandwich are a match made in heaven! A simple side salad with a light vinaigrette is also wonderful for adding a fresh contrast.
Quick & Easy Sides
If I’m short on time, a handful of crunchy potato chips or some crisp pickle spears are always a hit. They add that satisfying textural element and a tangy counterpoint that brightens every bite of the rich tuna melt.
Sweet Endings
Even after a savory classic, there’s always room for a little something sweet! My mom always says a scoop of creamy coleslaw (the slightly sweet kind) is a surprising, delicious pairing, or for a true dessert, a simple fruit salad offers a refreshing close to the meal.
How to Store tuna melt
After enjoying this delightful tuna melt, you might find yourself with leftovers – a wonderful treat for later! Storing them properly ensures they stay delicious.
Refrigerator Storage
To keep your tuna melt fresh, I recommend wrapping individual sandwiches tightly in plastic wrap or aluminum foil, then placing them in an airtight container. They will keep well in the refrigerator for up to 2-3 days. This method helps maintain their flavor and prevents them from drying out.
Reheating for Crispness
When it’s time to enjoy your leftover tuna melt, I always suggest reheating it in a dry skillet over medium-low heat. This helps to re-crisp the bread and melt the cheese beautifully, almost like it was freshly made. Avoid the microwave if you want that delightful crunch! For more ideas, check out my best meal prep tips.
Sara’s Freezer Tip
While best fresh, you can freeze assembled (but uncooked) tuna melt sandwiches! Layer parchment paper between them in a freezer-safe bag. When ready, grill from frozen, adding a few extra minutes. My personal tip for cooked leftovers: if you must use a microwave, a quick zap, then a finish in a toaster oven, can restore some crispness.
Nutritional Benefits
A tuna melt isn’t just delicious; it offers great benefits too! Tuna provides lean protein and omega-3s, vital for heart health. Combined with crisp red onion and fresh dill, you’re adding vitamins and antioxidants. It’s a truly satisfying and nourishing meal, showing how simple, wholesome ingredients can make for a delightfully comforting treat.
FAQs
Faq 1: Can I use different types of tuna for this recipe?
Yes! While solid white albacore is my favorite for a tuna melt due to its texture, light tuna works well too. Just drain it very well to prevent a watery salad. Quality tuna is key for the best flavor and consistency in your sandwich!
Faq 2: What’s the best bread for a crispy tuna melt?
For a perfect crispy tuna melt, I recommend a sturdy bread like sourdough or a good quality white sandwich bread. It needs to hold the filling and butter well, crisping beautifully without becoming soggy. My tip: thicker slices work wonderfully!
Faq 3: Can I make the tuna salad ahead of time?
Yes, you can! The tuna salad mixture can be made up to 24 hours in advance. Store it in an airtight container in the refrigerator. This allows flavors to deepen, often making your tuna melt even tastier. Just stir well before assembling for an easy, delicious meal!
Faq 4: How can I prevent my tuna melt from getting soggy?
To avoid a soggy tuna melt, ensure your bread is well-buttered and grilled until golden and crisp. Don’t overfill the sandwich with tuna salad, and make sure the salad itself isn’t too wet. Cook on medium-low heat for even crispness, a key to deliciousness!
Conclusion
There’s an undeniable magic in creating something wonderful from simple ingredients, and this classic crispy tuna melt truly embodies that spirit. It’s more than just a recipe; it’s an invitation to gather, share, and make beautiful memories around the table. I encourage you to bring this heartwarming classic into your kitchen and experience the pure joy of a homemade meal. Happy cooking, my dear friends!